
When my company started writing blog posts a year ago, we discovered two big problems. One was that writing took a long time (majority of us are developers!), the other was distribution. We believe in contributing to the developer community, but what was the point if no one was reading them?
When one of our colleagues suggested we try Medium for more exposure, we were excited. We read stuff on Medium, but how does it work? What topics are Medium readers interested in? We wanted to do some research to answer all these questions. I have a technical background so I suggested crawling some data to see what types of posts and publications performed well. Here, I’ll share with you how we built a web crawler in a day to help our content team figure out what topics to focus on.

It only takes a day to write a useful web crawler for your content team.
Do you need a technical background to build a web crawler?
Building a web crawler does require basic coding skills. For this project I, I used the following:
- Codecademy Python exercise (took about 3 hours and had 40% completion)
- Free Code Camp front-end course (algorithm section)
- Scrapy web crawler (written in Python)
- Script Editor in Google Spreadsheet (JavaScript)
The goal is to extract data from Medium and represent it in a nice spreadsheet for my team to analyze like the one below.

Knowing what type of content we’re crawling.
First, we began by choosing the information we wanted and could probably extract, such as title, keywords, tags, and post length. We also manually researched the size of popular publications and popular writer followings. FreeCodeCamp has great insights from the top 252 Medium stories of 2016.
How do we extract from all the different parts of a blog post on a page to insert the right data?
However, not all sites store data the same way. There are structured data and unstructured data. Structured content includes RSS, JSON and XML that you can extract directly from to represent in an ordered way (such as a newsfeed or put on a spreadsheet). Unstructured content like Medium requires a two-step process of extracting data from HTML, then turning it into structured data.
No matter how different the layout of blogs or publications sites look, the data falls into two categories, structural and unstructured. Now, we need to choose a tool to help us build our crawler that will extract this data.
Choosing your library: don’t build from scratch.
If you want to build something quickly like I did, open source tools are great. You can choose from a range of free crawler libraries for different programming languages. Here is a list of libraries you can consider.
This time, I choose Scrapy as it is an open source Python library and well. They also have a great community support so beginners can ask for help easily.
Using Scrapy to crawl data.

Install Scrapy
First, we will need to install Scrapy to your computer. You can follow the guideline here to install Scrapy on different platforms such as Windows, Mac OS X or Ubuntu.
Install the start project
One of the best ways to get started is using their start project since it helps you set up most of the configurations. Make a new directory and then run the following command after successful installation. (Or you can also read the documentation and set up everything yourself.)
<br />
scrapy startproject tutorial<br />
You will see a spider folder in tutorial directory. Then go to tutorial/spider, open a new file called stories_spider.py. Then paste the below script in this file:
<br />
import scrapy</p>
<p>class StoriesSpider(scrapy.Spider):<br />
name = "stories"</p>
<p>start_urls = [<br />
# urls that you want to crawl<br />
'http://example.com/post/',<br />
'http://example.com/post2/'<br />
]</p>
<p># For All Stories<br />
def parse(self, response):<br />
# Replace 'path' with the right css path that the data located<br />
for story in response.css('path'):<br />
yield {<br />
# Things you need to crawl<br />
}<br />
name: identifies the Spider.start_urls: List of URLs you want to crawl. The list will be then used by default implementation ofstart_requests()to create the initial requests for your spider.parse(): handles the response downloaded for each of the requests made.
For further details, you can reference the Scrapy documentation.
In order to crawl the data from Medium, we have to figure out the URLs & the paths of the data and put them to stories_spider.py.
Study the website: URLs
Now, you will need to let the crawler know which site you want to crawl data from. You will have to pass the right URL to your Scrapy program. Don’t worry, you don’t have to input every post manually. Instead, look in the Archives that tell Scrapy to look at all the posts published within (usually) the time period.
Medium publications have a page call ‘Archive’, where you can find the blog posts published in the past few years. For example, the URL for 2016 is https://m.oursky.com/archive/2016
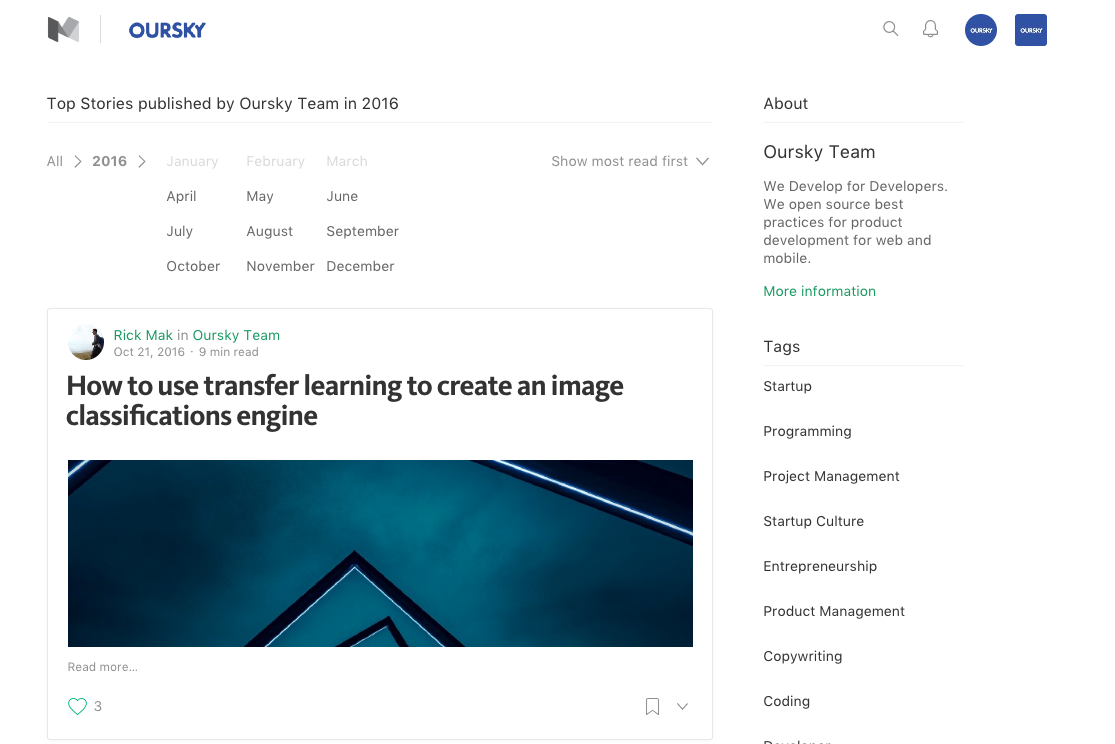
For Medium, you can find articles separated by year, then month, so you will have to input the URLs for the individual months.
Let’s crawl the Oursky publication from Jun 2016 — Feb 2017. I put the URLs in the stories_spider.py
<br />
import scrapy</p>
<p>class StoriesSpider(scrapy.Spider):<br />
name = "stories"</p>
<p>start_urls = [<br />
# urls that you want to crawl<br />
'https://m.oursky.com/archive/2016/06',<br />
'https://m.oursky.com/archive/2016/07',<br />
'https://m.oursky.com/archive/2016/08',<br />
'https://m.oursky.com/archive/2016/09',<br />
'https://m.oursky.com/archive/2016/10',<br />
'https://m.oursky.com/archive/2016/11',<br />
'https://m.oursky.com/archive/2016/12',<br />
'https://m.oursky.com/archive/2017/01',<br />
'https://m.oursky.com/archive/2017/02',<br />
]</p>
<p># For All Stories<br />
def parse(self, response):<br />
# Replace 'path' with the right css path that the data located<br />
for story in response.css('path'):<br />
yield {<br />
# Things you need to crawl with Path de<br />
}<br />
So far so good? Hang in there, because it gets a bit trickier!
Study the website: Identify the path of the components you want to crawl
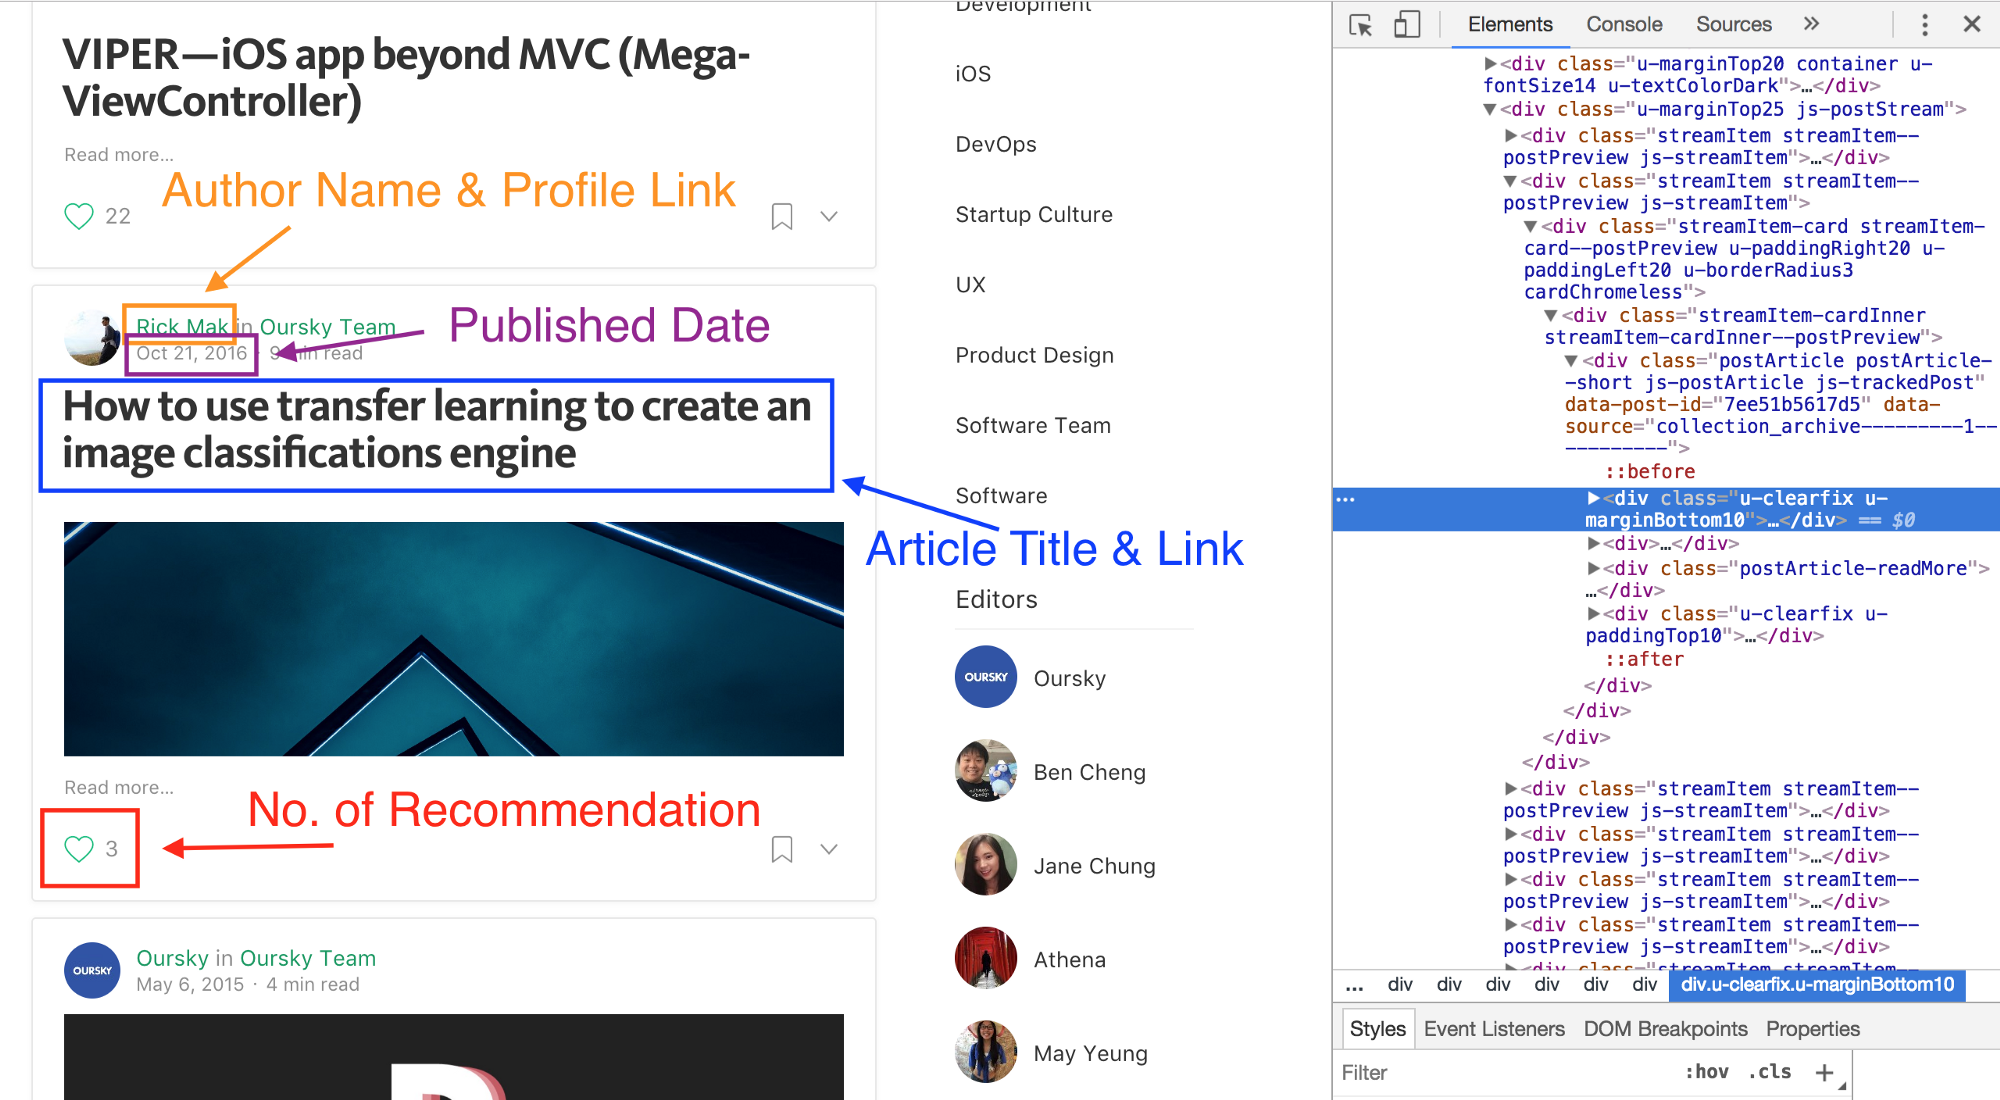
Now, we need to find the right piece of information (i.e. date, author name, link) in the CSS expression or XPath expression. When you open the site HTML, you will find the tags & class name (or ID name) for every line of code. Copy those IDs into Scrapy so it can can extract.
CSS expression uses CSS selectors to get the DOM element while XPath expression queries the XML structure to get the element. Both CSS expression and XPath expression can be crawled. You can reference Scrapy Documentation here for the format of the CSS expression or XPath expression. I personally like CSS expression more since I think the syntax is easier to read.
Below, I will use CSS expression to do the demo.
Let’s crawl the author name. I open the console to view the HTML and find the CSS tags and classes of the author name. The process is the same for author link, article title, recommendation and postingTime. For Medium, I found this information under div.u-borderBottomLightest. Then I focused on finding their path after div.u-borderBottomLightest
I listed a table for the CSS tags and classes of different elements and using this to write the codes in the program.
Telling your crawler where to look
<br />
# stories_spider.py<br />
import scrapy</p>
<p>class StoriesSpider(scrapy.Spider):<br />
name = "stories"</p>
<p>start_urls = [<br />
# urls that you want to crawl<br />
'https://m.oursky.com/archive/2016/06',<br />
'https://m.oursky.com/archive/2016/07',<br />
'https://m.oursky.com/archive/2016/08',<br />
'https://m.oursky.com/archive/2016/09',<br />
'https://m.oursky.com/archive/2016/10',<br />
'https://m.oursky.com/archive/2016/11',<br />
'https://m.oursky.com/archive/2016/12',<br />
'https://m.oursky.com/archive/2017/01',<br />
'https://m.oursky.com/archive/2017/02',<br />
]</p>
<p># For All Stories<br />
def parse(self, response):<br />
for story in response.css('div.postArticle'):<br />
yield {<br />
'nameOfAuthor': story.css('div.u-marginBottom10 div div.postMetaInline-authorLockup a::text').extract_first(),<br />
'linkOfAuthorProfile': story.css('div.u-marginBottom10 div div.postMetaInline-avatar a::attr(href)').extract_first(),<br />
'article': story.css('div.postArticle-content section div.section-content div h3::text').extract_first(),<br />
'articleLink': story.css('div.postArticle-readMore a::attr(href)').extract_first(),<br />
'postingTime': story.css('div div.u-marginBottom10 div div.postMetaInline-authorLockup div a time::text').extract_first(),<br />
'recommendation': story.css('div.u-paddingTop10 div.u-floatLeft div div button.u-disablePointerEvents::text').extract_first(),<br />
}<br />
Scrapy provides the Item class to define common output data format. For the items you want to crawl, you have to declare them using a simple class definition syntax and Field objects.
Open items.py in /tutorial, declare all the items you need to crawl.
<br />
import scrapy</p>
<p>class TutorialItem(scrapy.Item):<br />
# define the fields for your item here like:<br />
# name = scrapy.Field()<br />
nameOfAuthor = scrapy.Field()<br />
linkOfAuthorProfile = scrapy.Field()<br />
article = scrapy.Field()<br />
articleLink = scrapy.Field()<br />
postingTime = scrapy.Field()<br />
recommendation = scrapy.Field()<br />
Now, save items.py.
One more thing: you will want to also crawl sites with a robot.txt setup. Scrapy has provided a solution to ignore the robot.txt document. Go to /tutorial and open setting.py.
<br />
# In the middle of the file, there is a line for ROBOTSTXT_OBEY<br />
# Change the value from True to False</p>
<p># Obey robots.txt rules<br />
ROBOTSTXT_OBEY = False<br />
Save the setting.py and open your terminal again.
Extracting the Data as a JSON object
I wanted to extract the data as JSON object. I ran the following command in terminal
<br />
scrapy crawl stories -o stories.json<br />
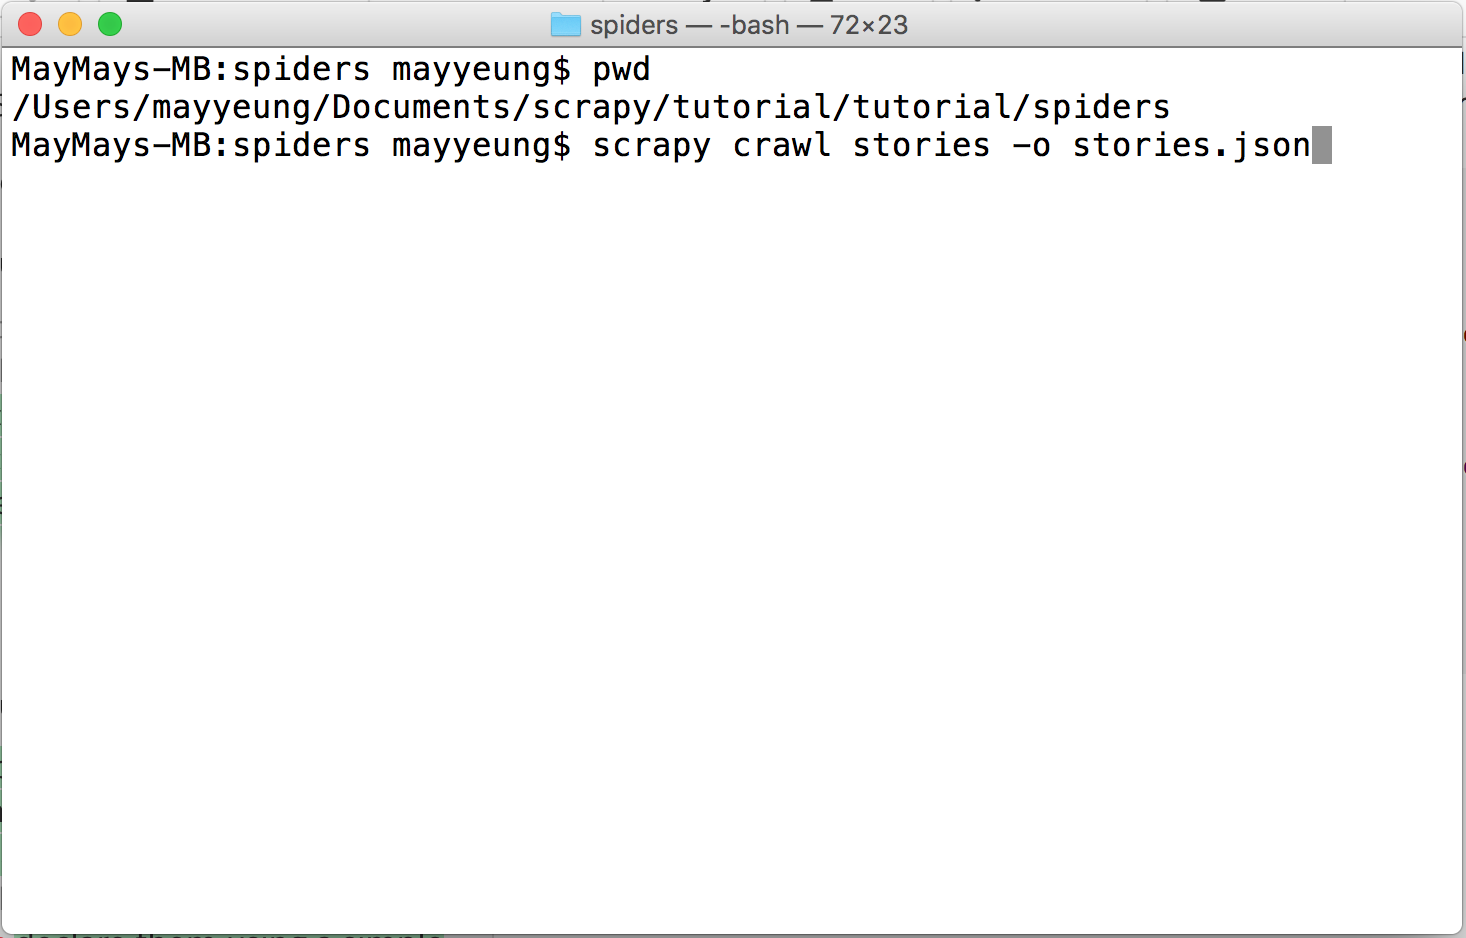

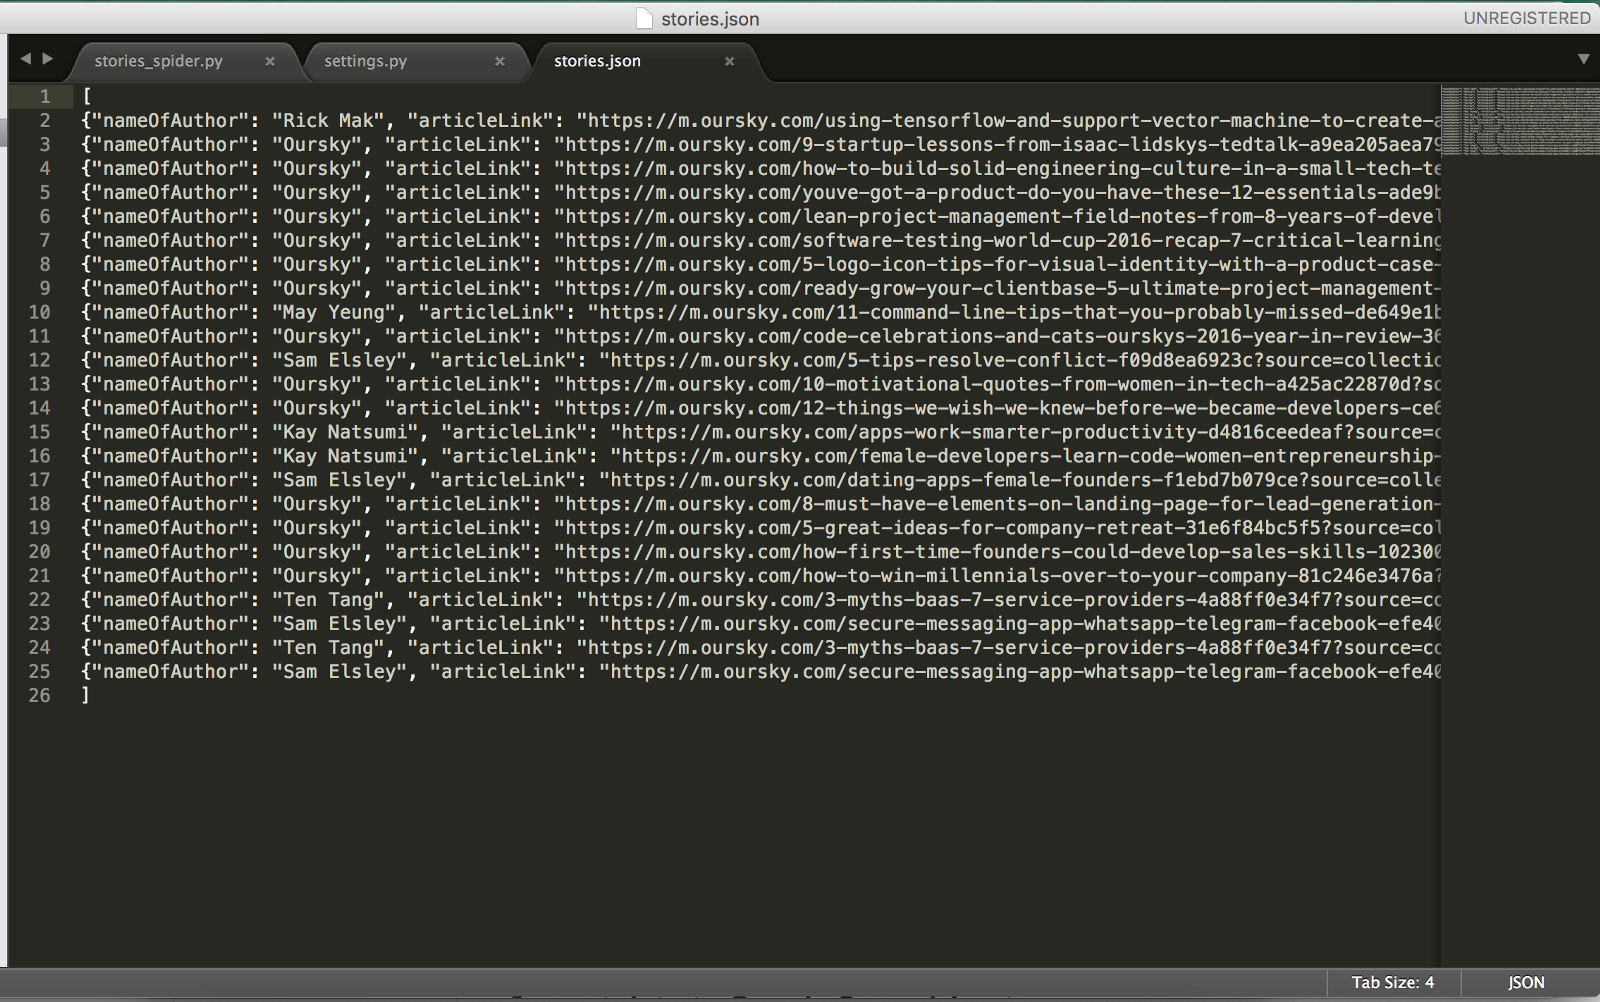
When it is done. You can see a Spider closed (finished). And I will have all the data in stories.json.
Now, it’s time to make all this information look a bit prettier.
Import data to Google Spreadsheet.
Now, I want to represent the raw JSON data on Google Spreadsheet for my colleagues to reference and manipulate in a more convenient way.
First, create a new spreadsheet on Google Drive. Google Spreadsheets has a Script Editor function for you to integrate it to other programs. Open script editor for writing your program.
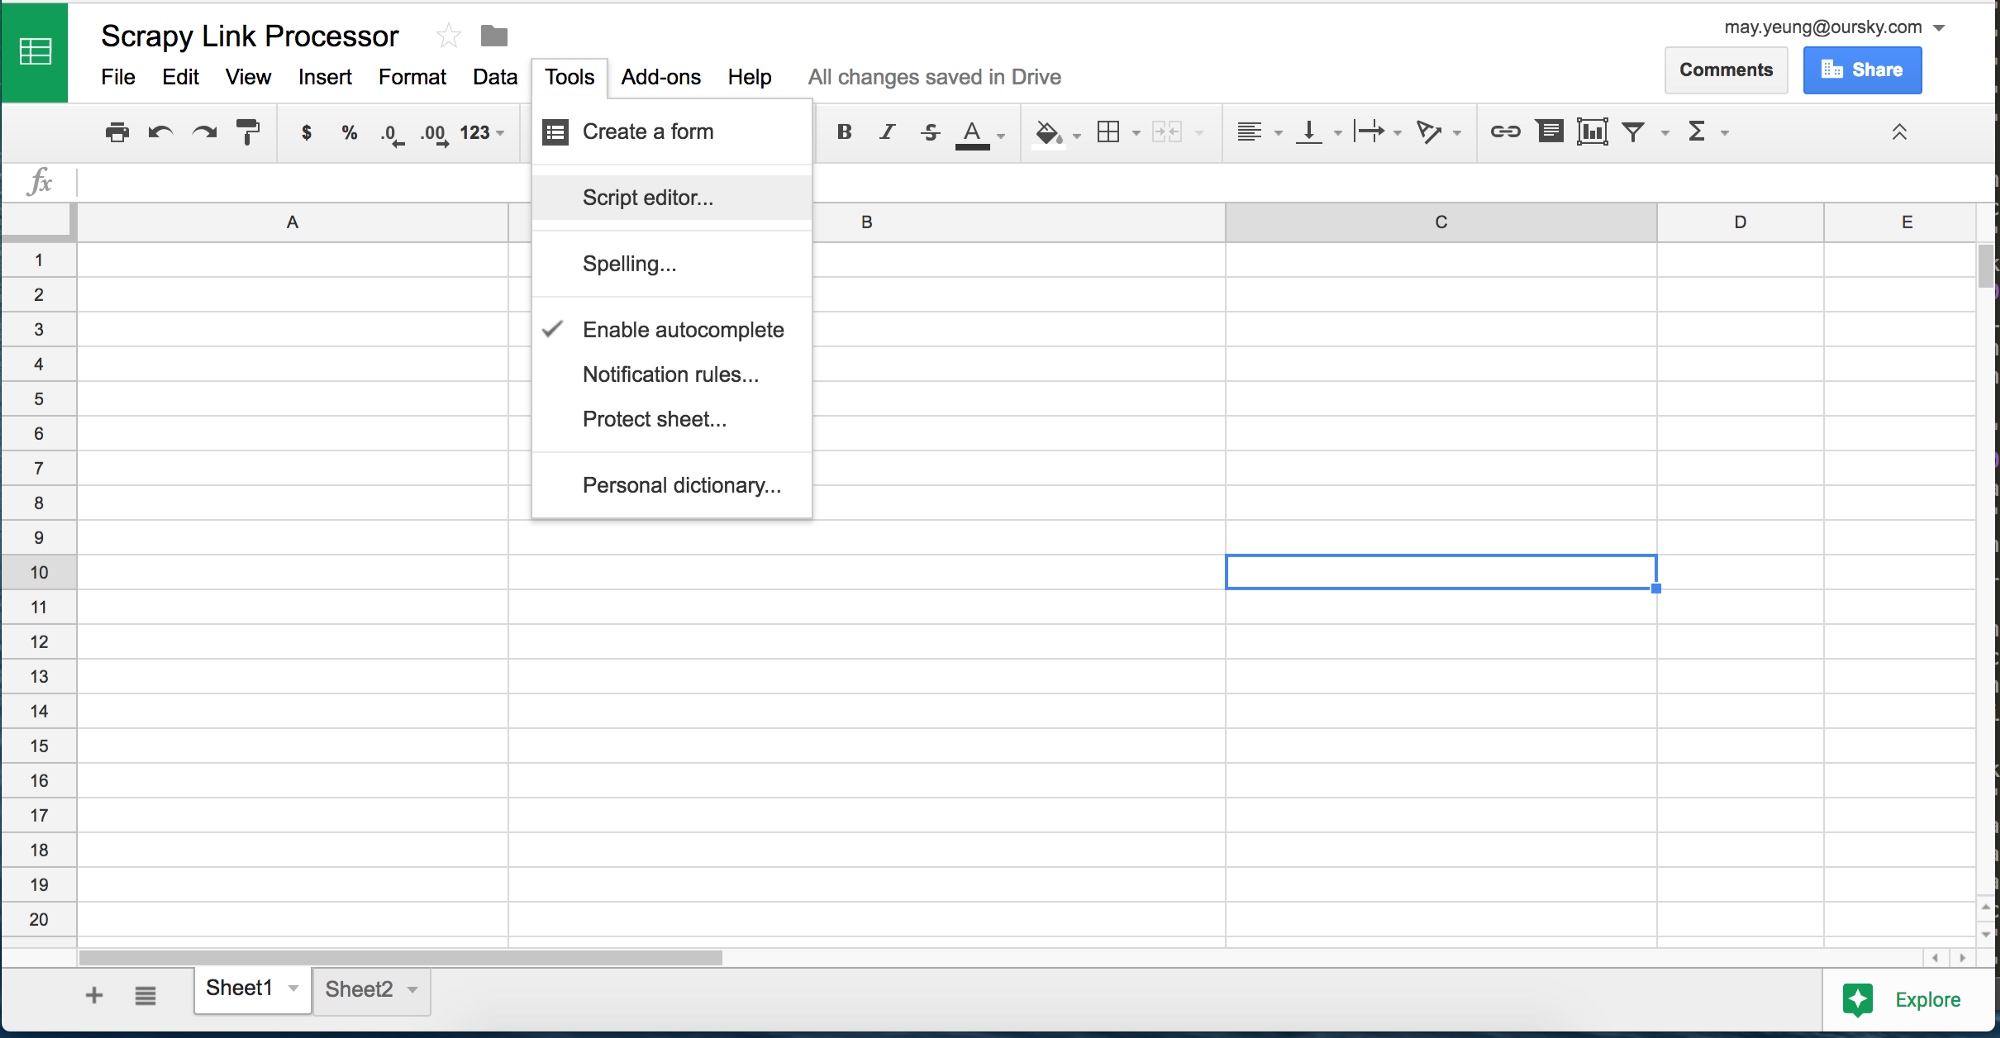
Steps for this program:
- Get the active spreadsheet and sheet
- Assign the JSON data to var info
- Loop through the data and write it on the sheet
You can try it yourself by referencing Google Spreadsheet Documentation. Below is my work.
<br />
function catJson() {<br />
var ss = SpreadsheetApp.getActiveSpreadsheet();<br />
var sheet = ss.getSheets()[1];</p>
<p>// Copy the whole JSON file here. Now here it is a few-lines example<br />
var info = [{"nameOfAuthor": "May Yeung", "articleLink": "https://m.oursky.com/11-command-line-tips-that-you-probably-missed-de649e1b5fe1?source=collection_archive---------2-----------", "linkOfAuthorProfile": "https://m.oursky.com/@mayyuen318", "recommendation": null, "article": "11 Command Line Tips That You Probably\u00a0Missed", "postingTime": "Sep 18, 2016"},<br />
{"nameOfAuthor": "Oursky", "articleLink": "https://m.oursky.com/code-celebrations-and-cats-ourskys-2016-year-in-review-369ff1cbf69f?source=collection_archive---------0-----------", "linkOfAuthorProfile": "https://m.oursky.com/@oursky", "recommendation": null, "article": "Code, Celebrations, and Cats: Oursky\u2019s 2016 Year-In-Review", "postingTime": "Dec 22, 2016"},<br />
{"nameOfAuthor": "Sam Elsley", "articleLink": "https://m.oursky.com/5-tips-resolve-conflict-f09d8ea6923c?source=collection_archive---------0-----------", "linkOfAuthorProfile": "https://m.oursky.com/@samuel_elsley", "recommendation": null, "article": "5 Tips to Resolve a Conflict\u200a\u2014\u200aOursky\u00a0Blog", "postingTime": "Nov 29, 2016"}<br />
];</p>
<p>for (var i = 0; i &lt; info.length; i++) {<br />
var rangeOfAuthorName = sheet.getRange(i+2, 1);<br />
rangeOfAuthorName.setValue(info.nameOfAuthor);<br />
var rangeOfAuthorProfile= sheet.getRange(i+2, 2);<br />
rangeOfAuthorProfile.setValue(info.linkOfAuthorProfile);<br />
var rangeOfArticle = sheet.getRange(i+2, 3);<br />
rangeOfArticle.setValue(info.article);<br />
var rangeOfArticleLink = sheet.getRange(i+2, 4);<br />
rangeOfArticleLink.setValue(info.articleLink);<br />
var rangeOfRecommendation= sheet.getRange(i+2, 5);<br />
rangeOfRecommendation.setValue(info.recommendation);<br />
var rangeOfPostingTime = sheet.getRange(i+2, 6);<br />
rangeOfPostingTime.setValue(info.postingTime);</p>
<p>}<br />
}<br />
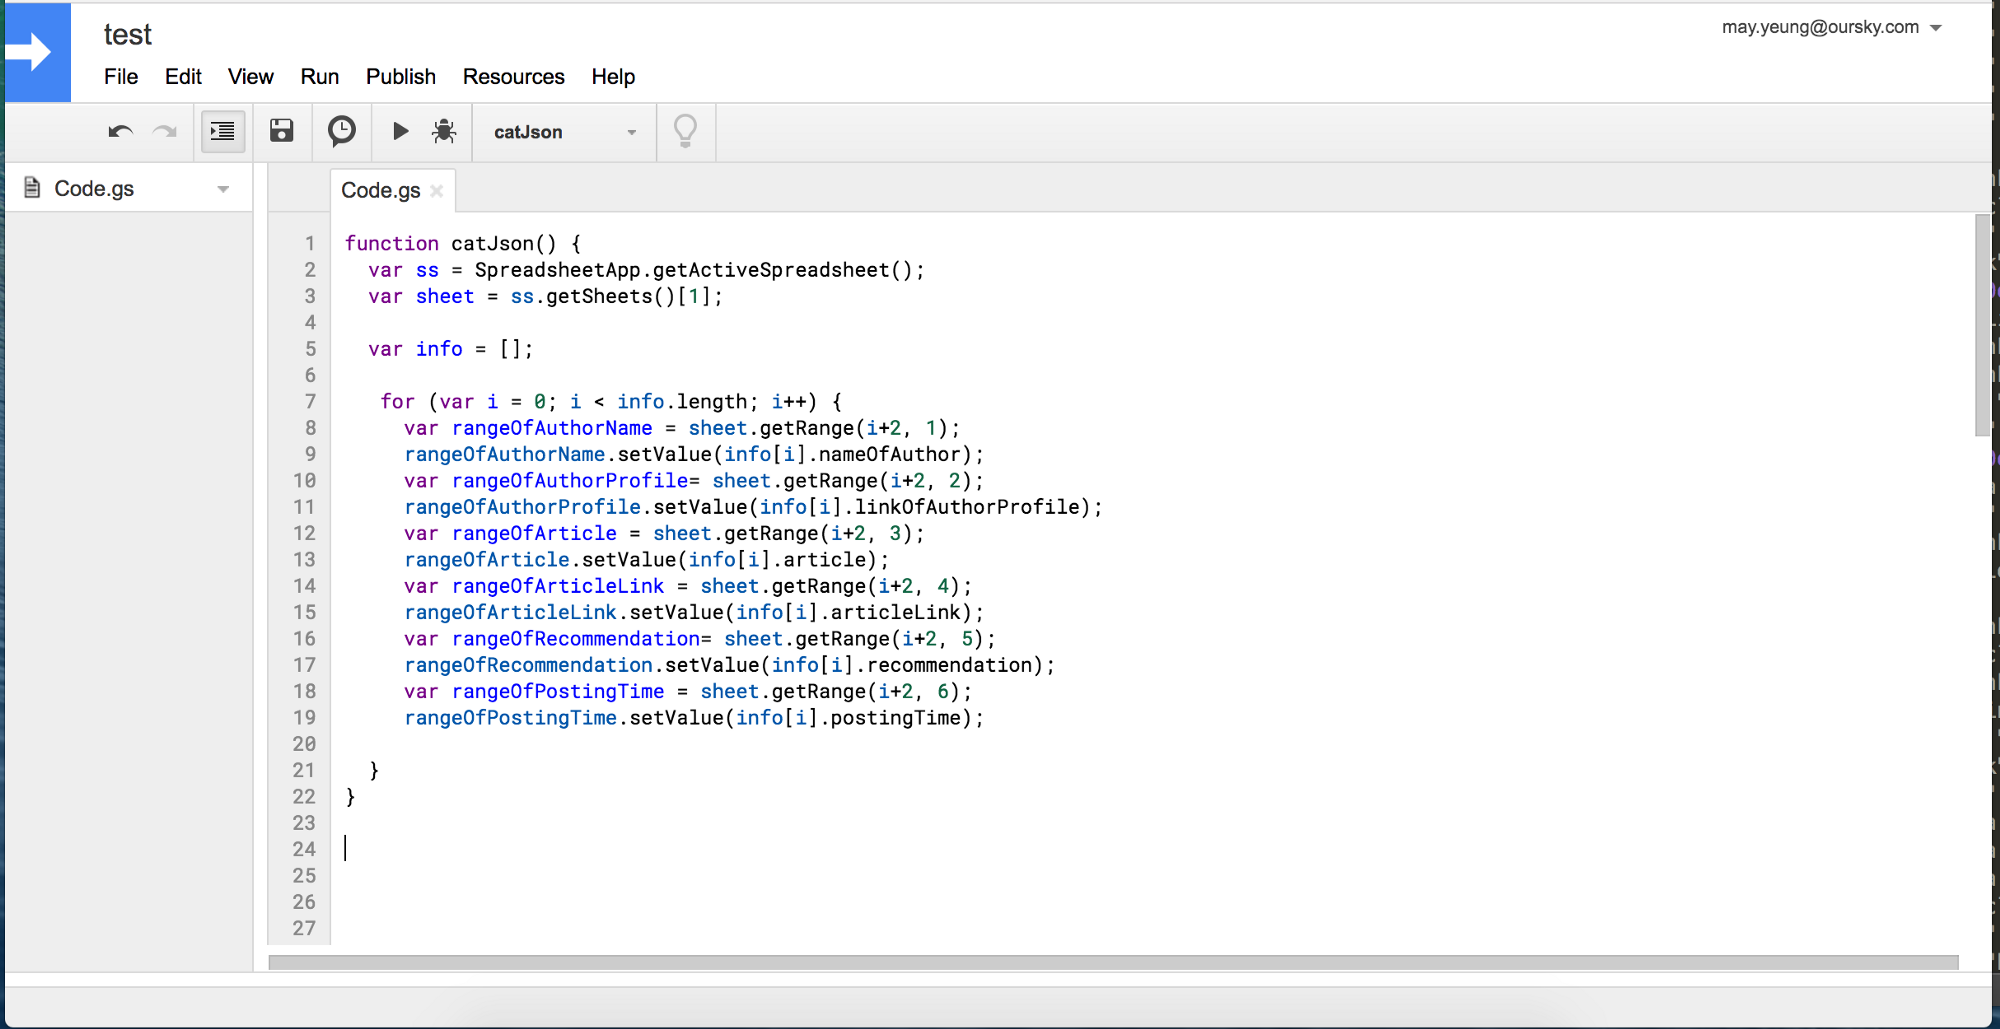
Save and press Run. You will then see the result on the spreadsheet.
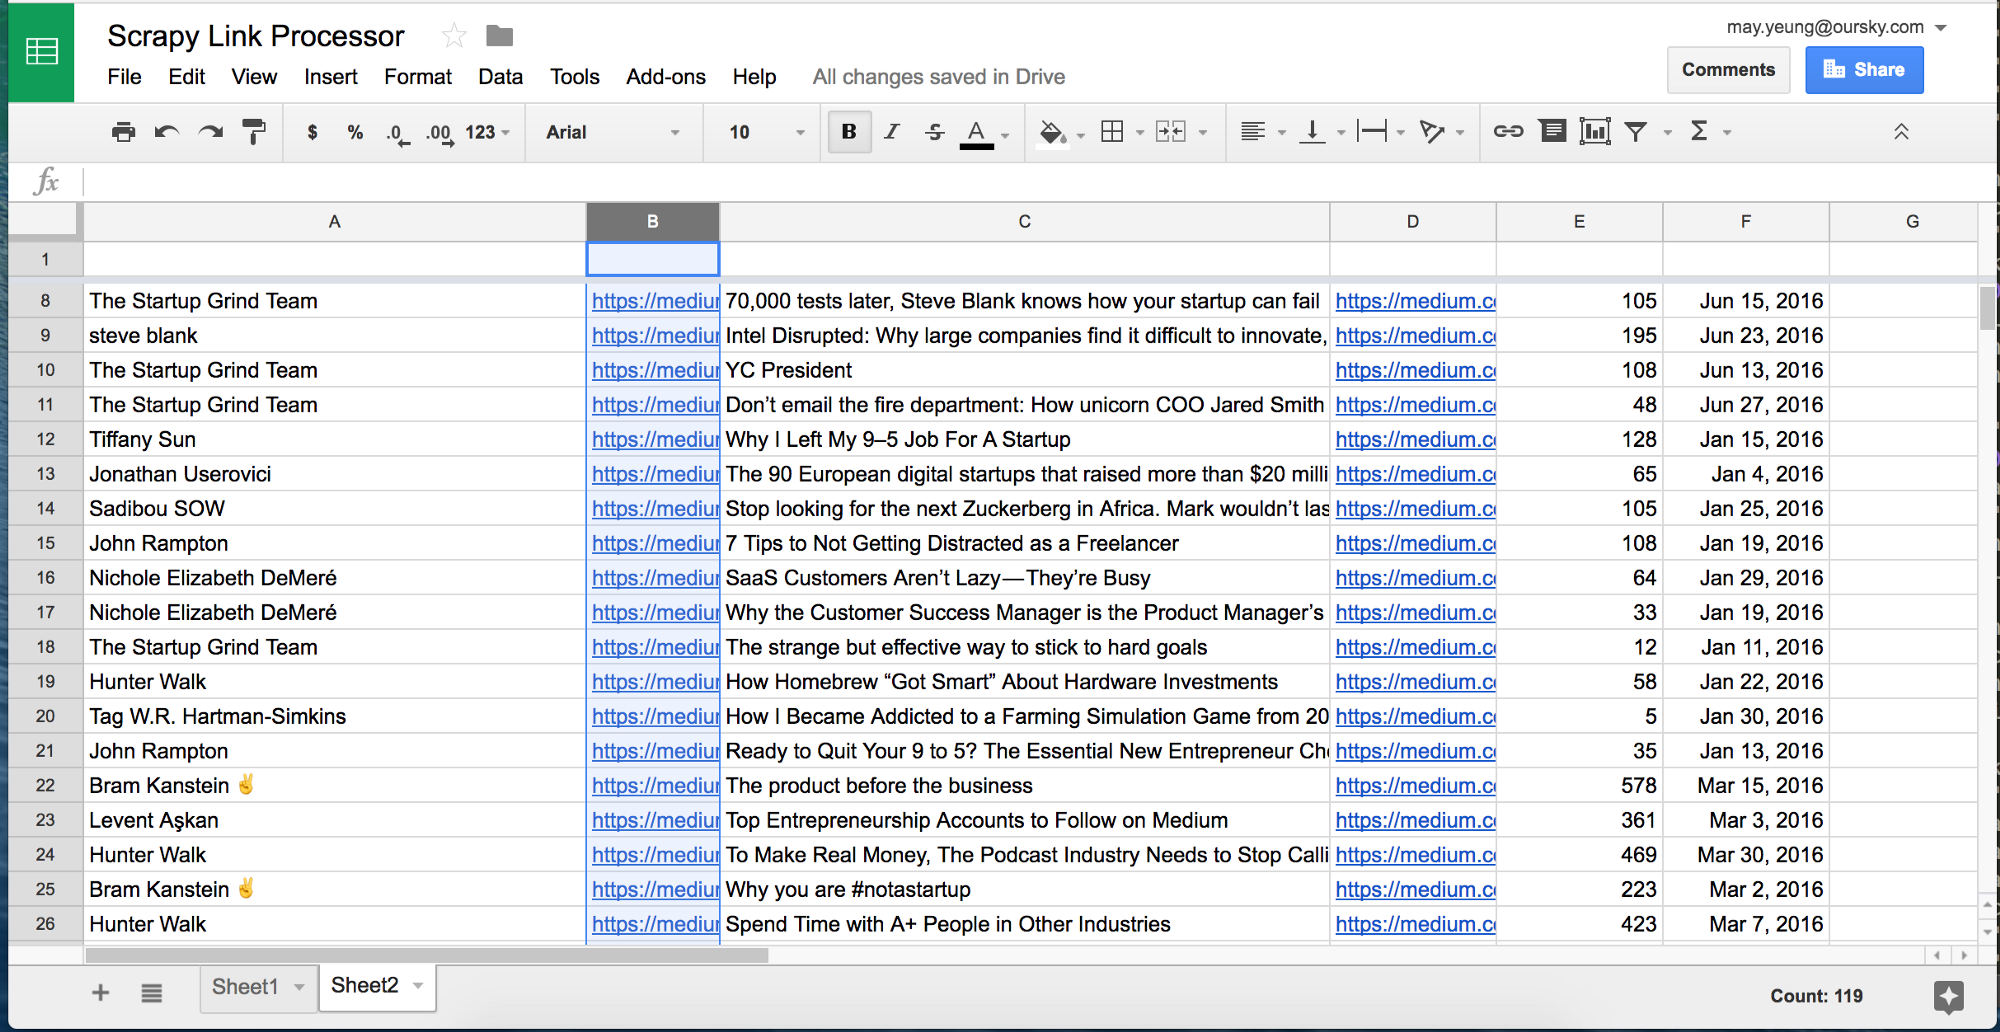
Done!
What can you do with this data?
One of my technical colleagues always says, ‘When you need to spend 90 seconds daily to work on something, you should write a program for it.’ This saved my content colleagues hours of work. Instead, they could focus on brainstorming topics to write on that overlapped with Medium readers’ tastes.
Other things you can do, for example, is calculate correlations between key words / posting time / read duration and recommends (as a proxy for reads / popularity).
We looked at Medium’s top tech and startup publications in turn and learned a few things:
- The biggest publications such as FreeCodeCamp and StartupGrind publish often
- The largest tech publications had many posts that were 1000+ recommends
- Many hit authors didn’t have to be famous
- Not all tech topics were the same (for example, “Serverless” and “BaaS” didn’t have that many recommends relative to more generic tags such as “programming” and “tech”)
How did this help us?
We have a lot of topics we are passionate about at Oursky. They can include serverless products and Tensorflow to hiring developers and building a team as an introverted founder. By analyzing this data, we were able to focus on the topics that were interesting for us to write, and for the Medium community to read. Within three posts, our founder, Ben Cheng became the top writer for the Startups section.
PS: One bonus tip from our content team based on our experience is that roughly 50 recommends is about 1000 views.
If you found this piece helpful, follow Oursky’s Medium Publication for more startup/entrepreneurship/project management/app dev/design hacks!


